Model railroading in India is not a popular hobby and to put together a group of operators is next to impossible … I tried and failed miserably ! Abendstern was thus planned ground-up with computer controlled operations and the single operator in mind…
Here is a video showing some aspects of Abendstern Nebenbahn under computer control….
The program I settled on was Train Controller from Freiwald Software after unsuccessfully trying out Winlok way back in 1998. TrainController is now in it’s 8th generation and I use the Gold version of it, with all it’s bells and whistles ……
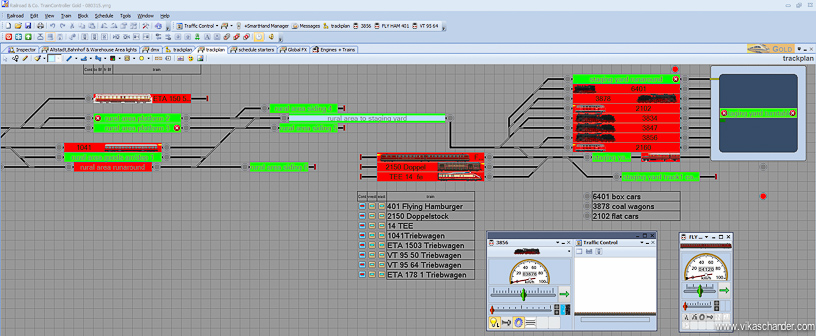
Normally, one would jump straight into the program and start setting it up. But I would strongly suggest that one’s model railroad be first set right and all the gremlins ironed out. After all the software can only send commands & instructions to the model railroad and it’s various components but the actual and correct execution of the commands itself is the responsibility of the components.
The first step essential for the flawless functioning is the trackwork itself. If there are continuous derailments or stalls then there is little TC Gold can do to keep the trains running. To this end I very carefully laid down the tracks for my layout and articles can be read about it here ….
 click on pic
Points must be set correctly each time as an incorrectly operating turnout can route a train to the wrong track and throw the whole operation into a mess. I find the tortoise stall motor switch machines perfect for the job…. Here is an article on how I installed the Tortoise switch machines.
 click on pic
Equally important is the track detection boards which have to be reliable as well. The earlier BDL16s from Digitrax used to have all sorts of false detection problems but Digitrax has since fixed the problem with the BDL 168 detection boards. These have been functioning flawlessly on my layout since. An article on the installation of Abendstern’s DCC system can be found here..
 click on pic
I take great care to ensure that the engines, which run on Abendstern, are absolute top-notch runners. Train-Controller has no means of knowing that an engine has stalled and is no longer running. This results in occupied or reserved blocks which ultimately bring traffic to a grinding halt.
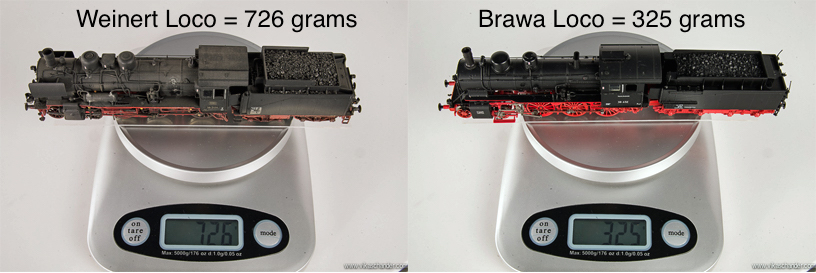
German loco manufacturers like Fleischmann, Brawa and Trix make some excellent models and they all run very well. However, these are comparatively lighter than a white metal loco from say, Weinert. The heavier white metal locos obviously pick up current from the track much better than the lighter ones and as a result i have been tending to lean more towards running the Weinert’s on my layout. The difference in weight is nearly double and this clearly reflects in the Weinert’s stall free running and reliability ….
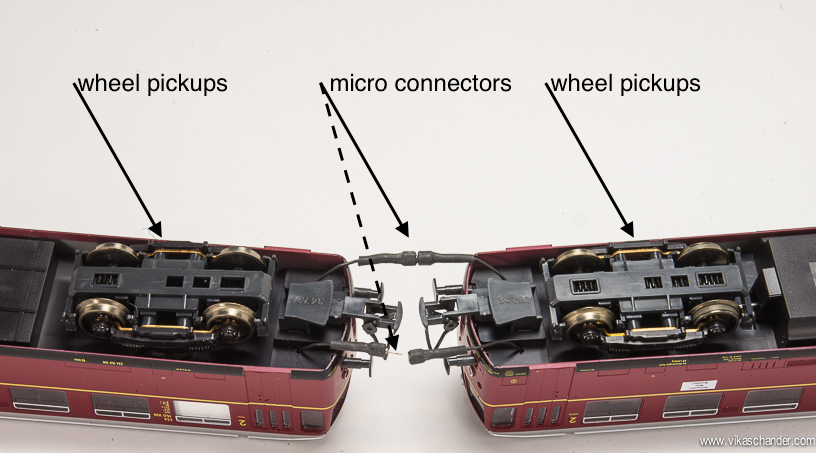
Another easy way to avoid stalls is have as many wheels as possible pick up current and pass it on to the loco….
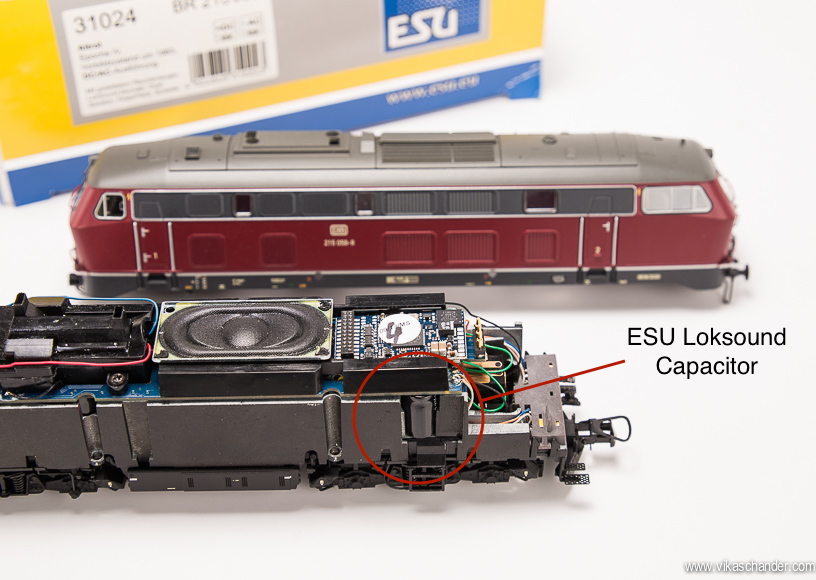
The newer generation of locomotives from ESU, have built in capacitors which also helps the locomotives to get over the current pickup problem
Finally, whilst locos can be detected on the layout due to their current pickups, rolling stock cannot. To have safe operations, the rolling stock also needs to be detectable on the layout. To this end no rolling stock makes it onto the layout unless resistors are attached to it’s wheels thus enabling them to be detected.
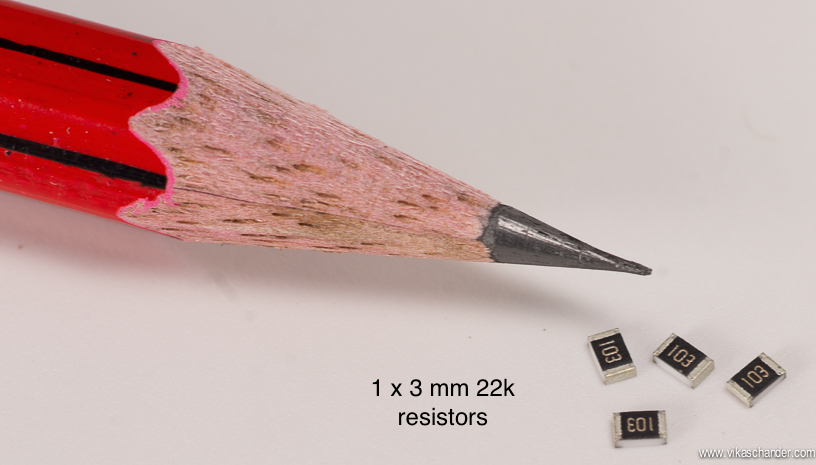
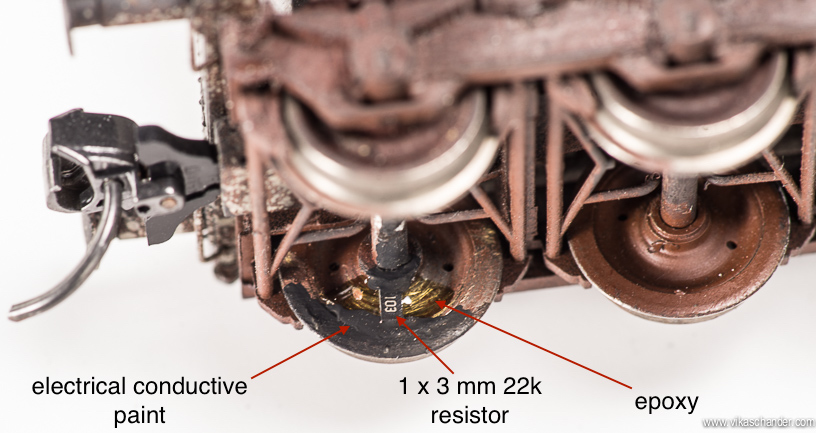
Just adding the resistors is sometimes not sufficient. I also put weights in the wagons as per the FREMO norms , a pdf of which can be found here
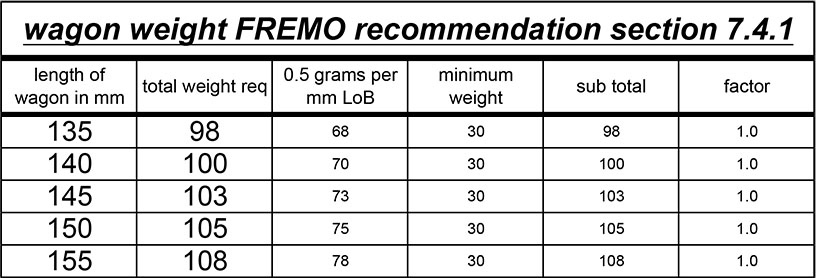
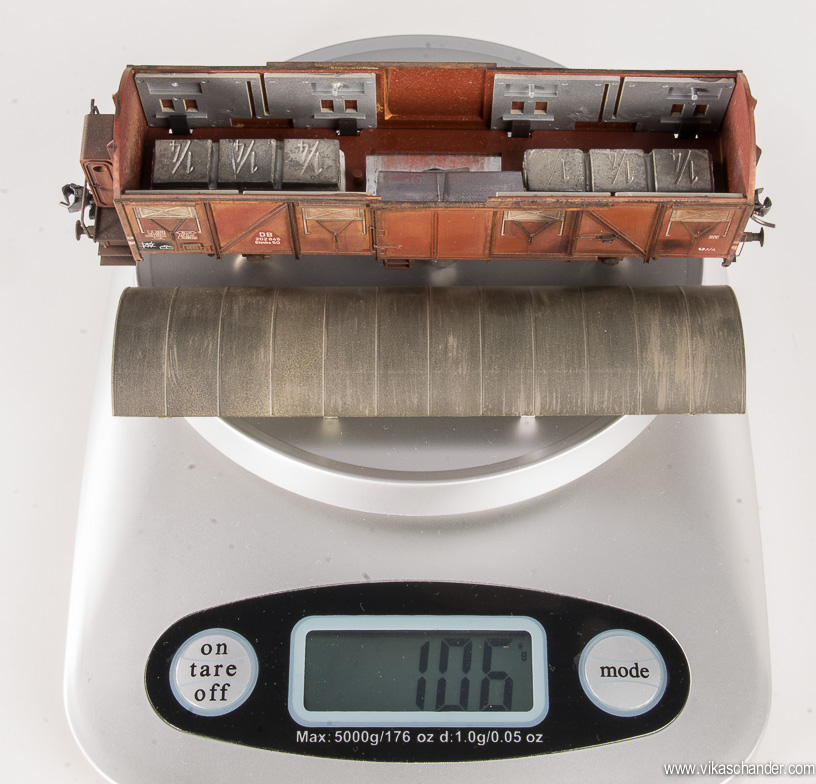
This not only improve it’s running and coupling characteristics, but also improves the contact of the wheels to the track. This results in a solid connection giving a consistent occupancy detection instead of an intermittent contact. Below we see a 150mm long box car weighted 1 gram higher than the correct requirement of 105 grams…
Having ironed out most of the gremlins on the layout i turned my attention to the actual programming of TC Gold. This involves defining all the blocks and turnouts present on the layout which needs to be arranged and named in a logical manner and obviously needs to be a reflection of the track plan itself. Below we see the trackplan for Abendstern’s main station ……..

and it’s block diagram in TC Gold, with all the blocks, turnouts, signals, uncouplers, traffic control buttons etc etc…..

After drawing out the trackplan using the many tools available in TC Gold, one normally starts out by defining all the blocks on the layout. A typical block on Abendstern is longer than the longest train I run which is about 7 ft. or 200 cms. Usually, 3 occupancy detection sections of a Digitrax BDL -168 are assigned to a block, two forming the stop indicators on each end and one forming the body of the block, each isolated from the other by cutting gaps in the rail.
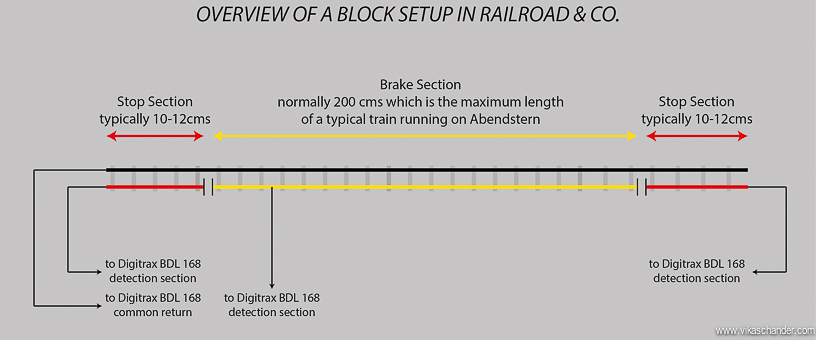
One has to measure the actual length of the block and feed it into the block editor. This enables TC Gold to know exactly when to start the decelerating process in order to bring the train to a prototypical halt at the stop indicator….
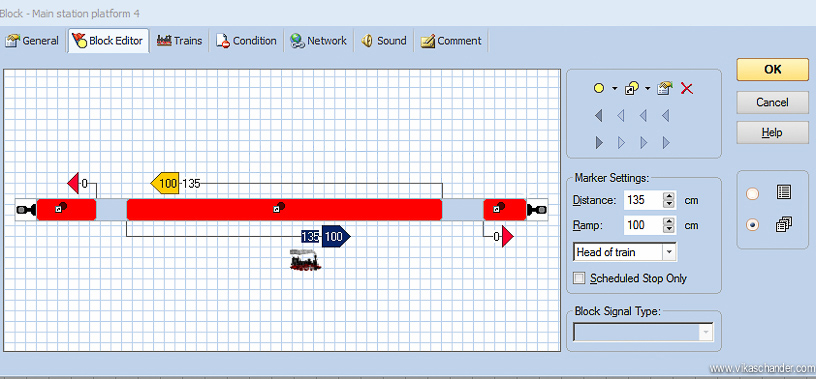
For instance, in the above block editor of “Main station platform 4”, a train entering into the block from the right will first trigger the right hand side stop detection section ( indicated by the red triangle ). This has no effect on the train speed as it is a stop section for trains arriving from the left. The train then triggers the brake section and after traveling for 135cms will start slowing down over the next 100 cms till it reaches a crawl and comes to a stop when it triggers the left stop section. This of course is applicable to trains which will stop in this block. Those which do not have to stop in this block pass thru at the designated speed limit of the block.
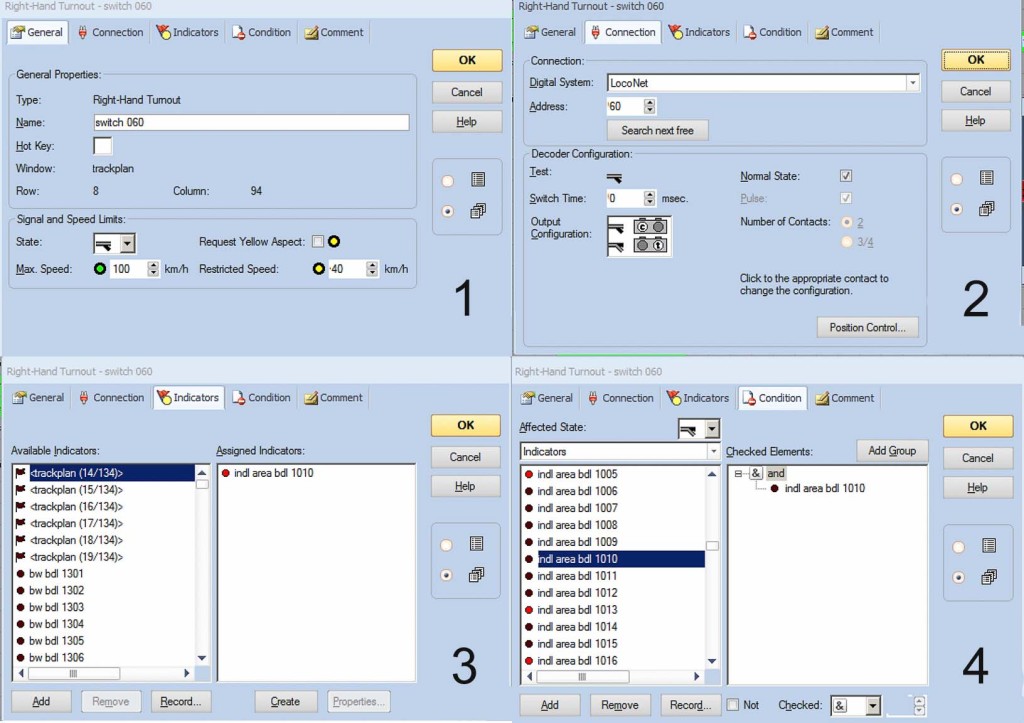
The next logical step is to feed in the turnouts digital addresses and to assign them to detection sections. As all elements in TC Gold , the turnout settings dialog boxes have a vast array of choices.
Window 1 – General – is for naming the turnout and assigning speed limits to the straight and diverging routes.
Window 2 – Connection – is for assigning the digital system & address , (in this case Digitrax Loconet & turnout address #60). One can also reverse connections and set the time in between switch operations.
Window 3 – Indicators – is for assigning the detection section , in this case a Digitrax BDL 168 with a board address of 10 with detection input # 10.
Window 4 – Condition – is for setting up the situations in which the turnout state can be changed, in this case if detection section 1010 is unoccupied
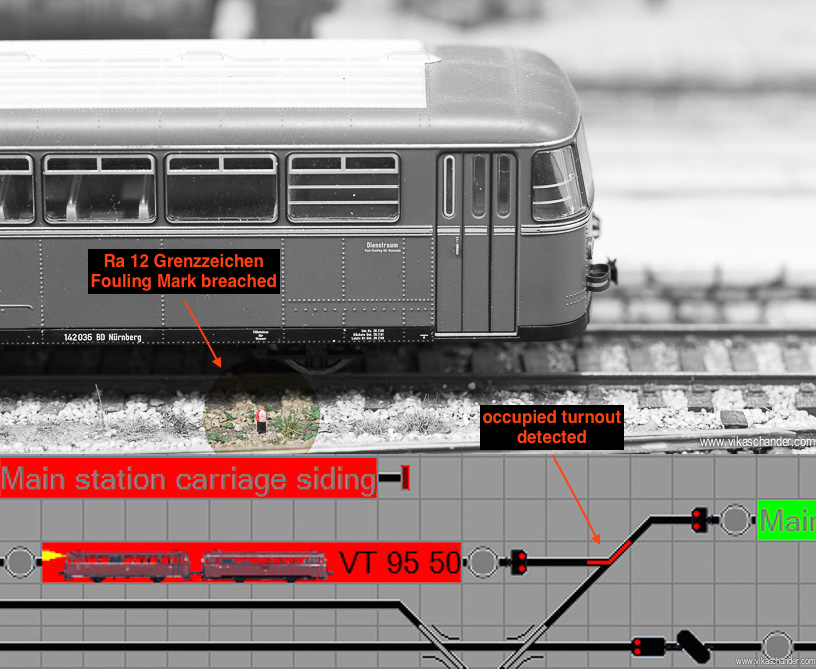
Whilst assigning occupancy detection sections to turnouts is not mandatory, i do it all the same as a safety measure. The software can be programmed to prevent occupied turnouts being operated and avoid situations where turnouts are thrown inadvertently underneath passing or inappropriately located trains as we see below.
A VT95 rail bus has breached the fouling mark of a turnout and triggered the occupancy sensor, thus rendering the turnout inoperable. This has two advantages, one being that no route through this turnout can be activated thus preventing a collision or a sideswipe. Secondly by preventing the operation of this turnout to it’s closed position a short circuit is also avoided, which would otherwise have occurred due to the powered frogs being used on Abendstern.
Once the blocks and turnouts are drawn in , TC Gold is able to automatically detect the routes between blocks as well as the turnouts which lie en-route. When these routes are triggered, TC Gold automatically operates the turnouts falling in the route to their correct alignment. This way setting complex routes involving many turnouts including double slips and 3-ways are just a mouse click away. Below we see a route being set, as depicted by the white highlighted line, between the Main station exit block to the Industrial area entry block.

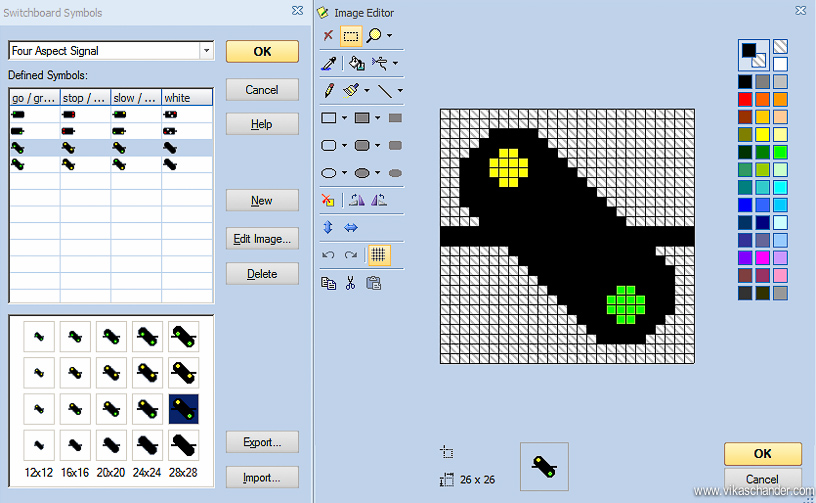
Notice how the signal has also been set to the correct aspect. A bit-map symbol editor built into TC-Gold makes easy work of drawing any prototype signal.
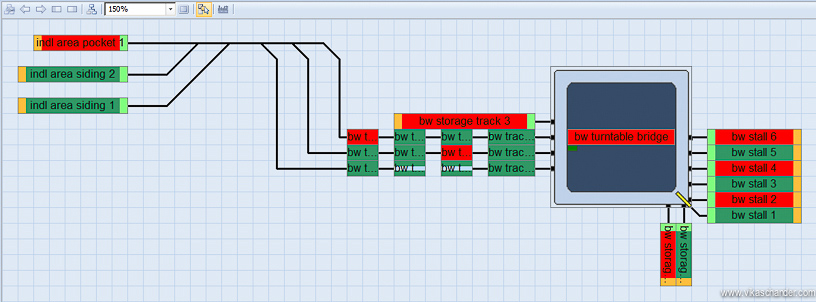
Now that the software has the “ picture” of the layout, various schedules can be made which control the movement of trains and their actions and behavior as they pass thru various blocks from their origin to their destination. Whilst i prefer a dedicated schedule to each train composition on Abendstern, one of the more interesting schedules on Abendstern is the BW schedule or the Loco shed schedule. This single schedule commands 9 locomotives to come out of their roundhouse stalls, negotiate a turntable and then head down the tracks to a holding yard and then reverse back via the turntable back into their stalls. The tank locomotives go into the shorter stalls, the tender locos into the longer stalls whilst the diesels stay in sidings outside of the roundhouse. Schedules reside in what is known as a Dispatcher window as seen below.
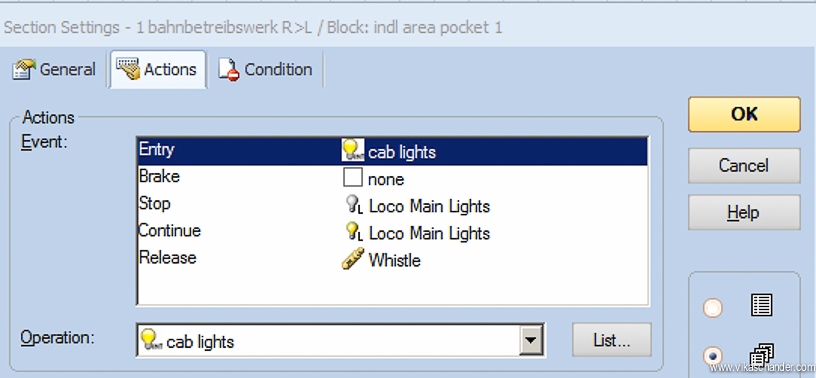
Within the schedule , one can assign specific actions to take place when the loco under control of the schedule enters a specific block . These are known as schedule specific settings and below we see one where when any loco under the control of the schedule “1 bahnbetreibswerk R>L” enters the block “indl area pocket 1 ” then upon entry into the block it will whistle and shut of it’s Headlights when it comes to a stop. Upon restarting it will put on it’s Headlights and whistle as soon as it has left the block. Needless to say the possibilities are endless and one can really bring their layouts to life with all the power and control TC Gold provides. More of this schedule running can be seen in the video above….
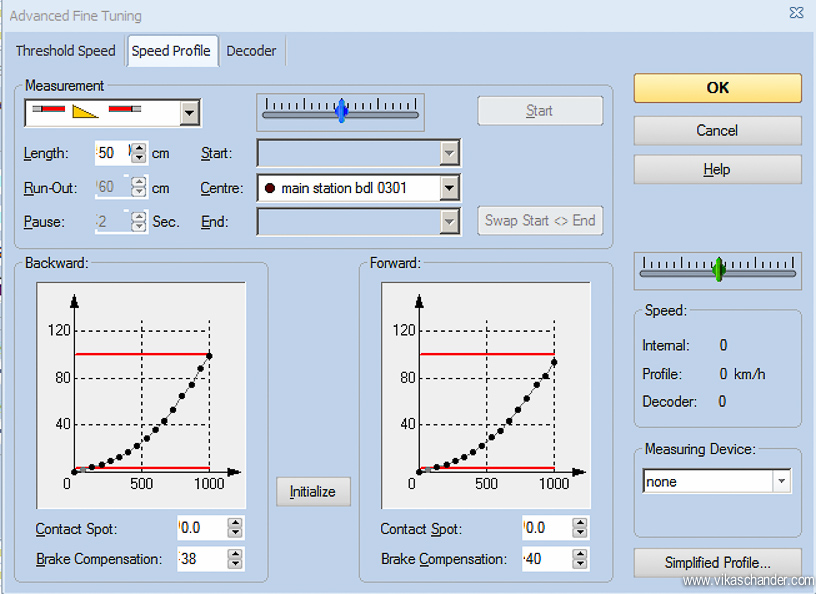
The software also needs to know about the behavior of the various locos under its control. To achieve this the software has to conduct what is known as speed–profiling. The loco being speed profiled is made to operate back and forth over a known length of track, which enables the software to figure out its scale speed at various speed steps of the decoder installed. Finally, a brake compensation test is done to ensure the locos come to a smooth halt with controlled deceleration. The importance of speed-profiling can hardly be over emphasized and the correct execution of this process is key to smooth operations of the locomotives under computer control. Below we see the dialog box of a loco which has already been speed profiled. Notice the smooth speed curve indicative of a correctly profiled locomotive
German railway signaling is a complex subject as can be seen in the below NMW signal with 14 aspects…..
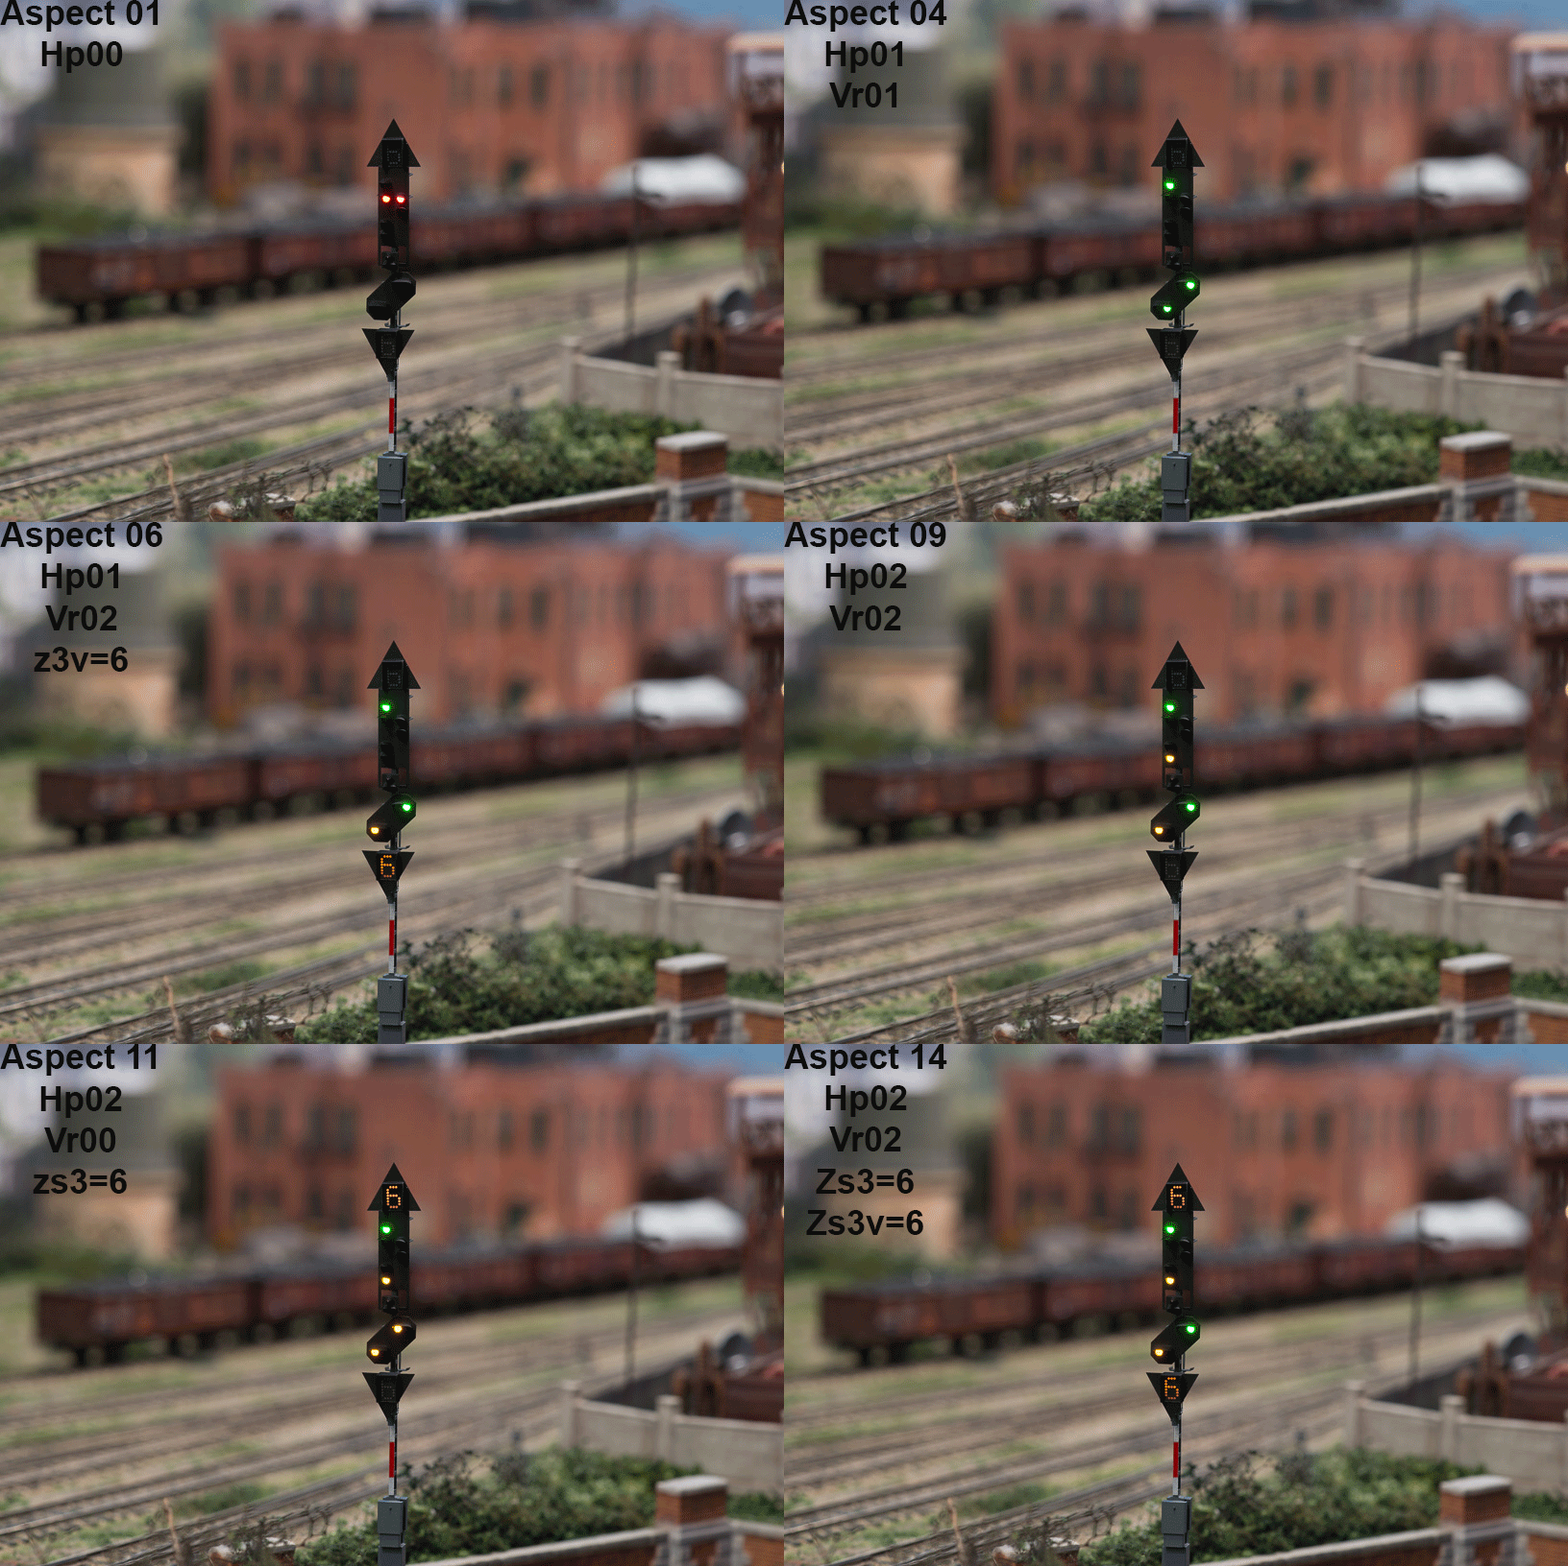
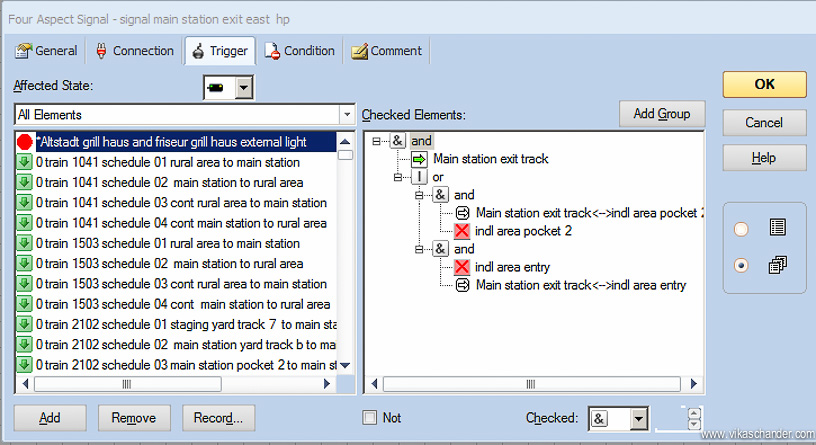
The signaling logic for this signal would seem a daunting task but it is actually very easy with TC Gold, once one breaks up the task into bite sized pieces. The 14 aspects are displayed over 4 heads – from top to bottom – the main signal speed display, the main signal itself, the distant signal and the distant signal speed display. One starts by assigning digital addresses to each of the 4 heads. Then by focusing on one head at a time, particular conditions which trigger a certain aspect are fed into the Trigger dialog box of that aspect. For example, below we see some simple AND/OR conditions which trigger an Hp2 (or yellow) aspect for the Main station east exit block signal. By similarly feeding in the various triggers for all 14 aspects one can achieve a prototypically correct, operating signal.
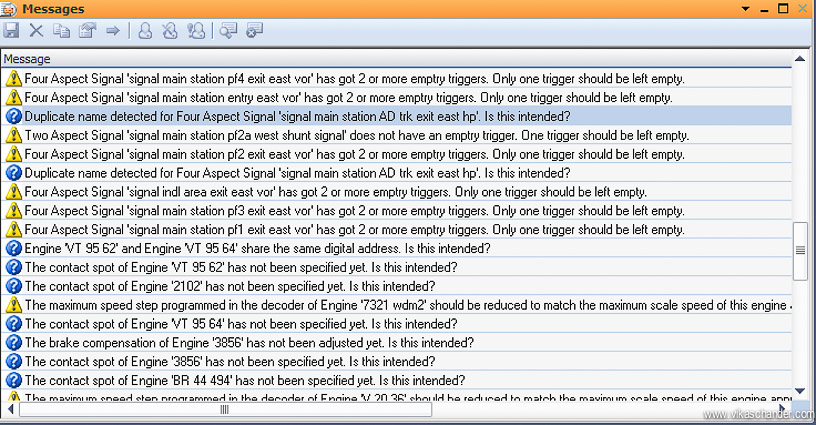
Dr. Railroad has a troubleshooting feature built into the software which logs all the errors made by the user whilst programming and even offers solutions and suggestions on how to rectify them. As one can see below, i have a lot of mistakes and errors which need correcting !!
Layout lighting is an oft-neglected part in the drama of model railroading. I spent considerable time and effort in setting it up for Abendstern. Using DMX control and interfacing it with the TC Gold allowed for some interesting day-night transitions and other effects on Abendstern. An article on the subject can be found here. Below is a video on the topic…
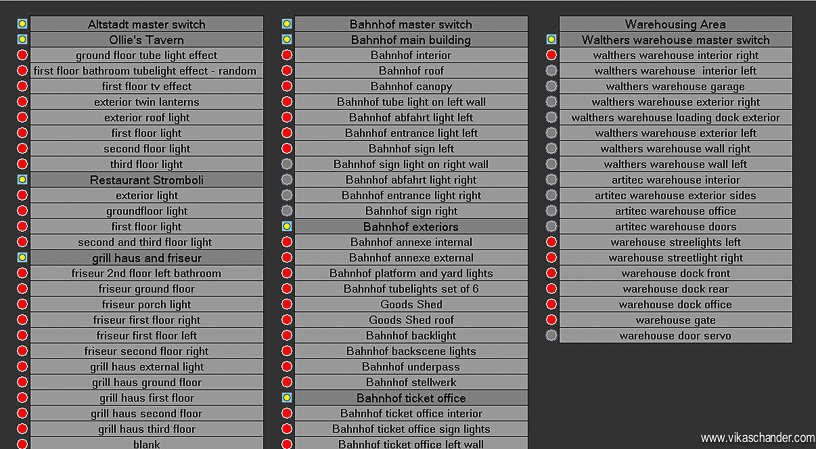
RR&co. allows one to setup switchboards for various applications. I set up one for controlling all the interior lighting of structures and animation effects on the layout. It makes life easier controlling all the lighting from one location, arranged in a logical manner. I set up the below switchboard so i can have micro or macro level control over the structures and building lighting. For example, with one switch i can switch on ( or off ) all the Altstadt lights, or then just individual structures in the Altstadt like Ollie’s Tavern or the Stromboli Restaurant, or then a particular light within the Grill Haus. As time permits and i dive deeper into the software, i hope to learn about the Randomize function and see how i can use that to have the structure lights come on and off in a random fashion, thus adding more movement and drama to Abendstern.
One can also add on the 4d sound module available from Freiwald Software to TC gold. Designed to cater to off board sound for locomotives, I use it essentially to control ambient sound and other layout sound effects. I have four speakers installed in the four corners of the room and the module allows me to position any sound anywhere in the sound field created by the four speakers. In the below example, we have a “crickets at night” sound effect where the rural river scene is, it’s location being defined by the small round circle in the white oval sound field.
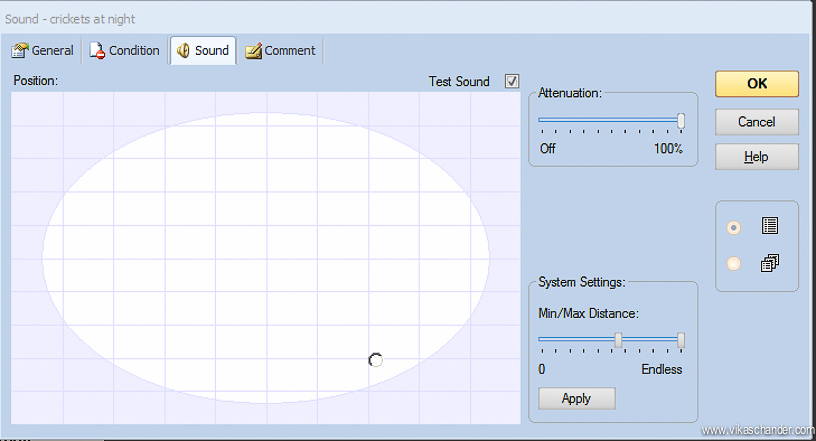
Using soundtrack cds from Fantasonics, I arrange the sound clips in their appropriate location in the soundfield. The roundhouse soundtrack is assigned to the top right of the soundfield whilst the city sounds are more to the top left of the soundfield where one can hear it above the Alstadt. Rain sounds are kept in the center of the soundfield so when it rains you can hear it everywhere on the layout.

Sounds are also assigned to buttons on a switchboard where they can be triggered at a mouse click or a tap gesture.
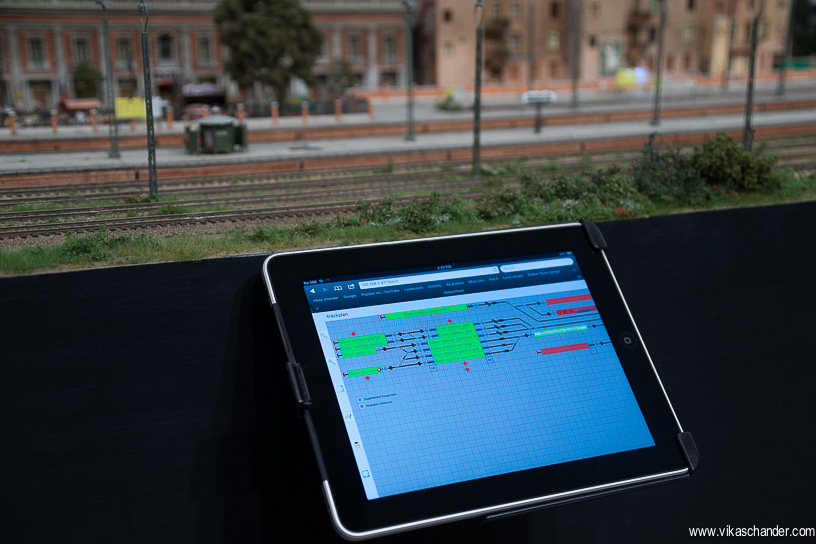
Tap gestures brings me to the +SmartHand add-on module which allows the use of a smartphone or tablet to wirelessly control all aspects of the layout. I use it all the time to trigger schedules or lock and release blocks to control traffic whilst I am operating the layout, negating the need to run back to the main computer every time. Below we see the Main Station track control panel on an Ipad thru which i can control all the switches, uncouplers and routes on the layout.
Another add-on module is Train Animator and this allows one to create custom icons and use actual locomotive pictures in the locomotive profiles, which then appear in the block diagrams. This makes it very easy to identify which locomotive is where on the layout.
For example , i downloaded this VT95 image from the web…..

and then cleaned and edited it in the Train Animator image editor, adding a yellow headlight beam so i knew which direction was forward….

Using the image in the loco profile of a VT 95 in use on Abendstern, one can see below how easy it is to identify which block on the layout it is currently situated…

Whilst the learning curve of the software can be steep especially when the initial gremlins of the layout and rolling stock have not been ironed out, with time it sorts itself out. The very active forum features topics ranging from the simple to the very complex, all of which are discussed in depth making it all too easy for the newbie as well as the seasoned operator.
RR&co. has added new features with every new release and whilst I am just scratching the surface above, it is truly a software which runs very deep with it’s many features like the timetable or the fast clock, or the complex logical counters etc. which I am yet to implement.
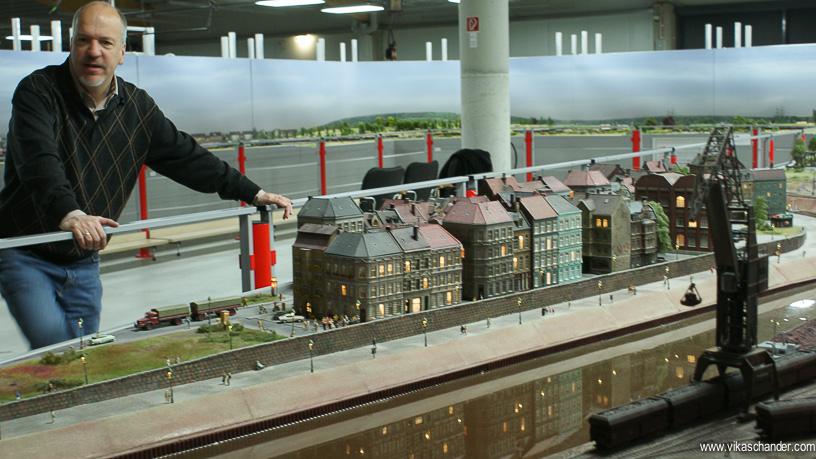
A big “thank you” to Jürgen Freiwald ( seen below at the now defunct MiniaturWelt Oberhausen ) for coming up with this masterpiece without which I feel Abendstern Nebenbahn in its current form would not be possible…
Hi Vikas,
Your layout is very impressive. I am a Delhite based in Kuwait and a model railroader. I live in an apartment so my layout is just 4.4m x 1.4m. I model American railroads although some aspects of my models are freelanced e.g. my grade crossing barriers are typically yellow & black Indian barriers; of course, they have working grade bells & lights US style… In short I do it for fun & am not afraid to bend rules to suit my liking. Finding other hobbyists is virtually impossible in Kuwait so I keep myself busy with some basic operations and working on new ideas. I recently completed constructing an interface which utilizes an arduino to drive servos using the outputs of digitrax SE8C (which are designed to drive tortoises). My interface can handle up to 16 servos using 2 SE8Cs. My interests are mainly in electronics and therefore I found a lot of your initiatives very interesting. Maybe we should meet up when I am in Delhi next.
Best regards & have a good day!
Joy
Very inspiring layout and clear post: I regularly watch your videos and I appreciated this one particularly.
It gave me lots of suggestions on about how to set up the velocity profile of my engines.
Keep up with the good work!
Nicola
Thank you for sharing your very impressive and realistic layout. I would like to see it operating. I am building my layout, also using TC, and your layout is an inspiration. I agree with all your comments regarding TC as well as the comments submitted by Henk. The videos, commentary and sound track are outstanding and informative. I found it interesting that you left your roof sections off the roundhouse and some other buildings.
Absolutely blown away by layout realism, attention to detail and the huge amount of thought that went into this. Easily one of the best executed projects I have ever encountered in the modelling world.
The smooth running of difficult steam engines is something I have never seen done so well.
Wish I was in India for an opp session, must be quite a thing to take part in.
Congrats on a stunning layout and clearly, a very sharp and inquisitive mind to keep finding new solutions to old problems.
Best regards,
Henk
I am quite sure I can recruite a group of experienced operators for you layout and bring them to India for a week of operation and a second week of recreation.